Say Goodbye to Store-Bought: Unveiling the Magic of Superior Homemade Naan
Tired of dry, uninspired store-bought naan that crumbles at the first sign of a delicious curry? Imagine a world where warm, pillowy, subtly tangy flatbread, fresh from your skillet, is a staple at your dinner table – and it takes less than two minutes to cook each one! Sounds like a dream, right? This isn't just a fantasy; it's the reality you're about to step into with our definitive guide to crafting
simple yeasted homemade naan a step by step guide. Forget complicated techniques and endless kneading; this recipe is designed for maximum flavor and minimal fuss, proving that superior naan is not only achievable at home, but astonishingly quick.
For too long, naan has been relegated to the realm of restaurant fare or the sad, plastic-wrapped aisle of the supermarket. We're here to reclaim it, demonstrating how a few basic ingredients and a surprisingly straightforward process can yield bread that far surpasses anything you can buy. Prepare to impress your family and friends, and most importantly, treat yourself to the sheer delight of fresh, warm naan whenever the craving strikes.
Why Homemade Naan Reigns Supreme: A Taste Revelation
Once you experience the difference, there's simply no going back. Homemade naan isn't just better; it's a revelation. Here's why you'll become a convert:
*
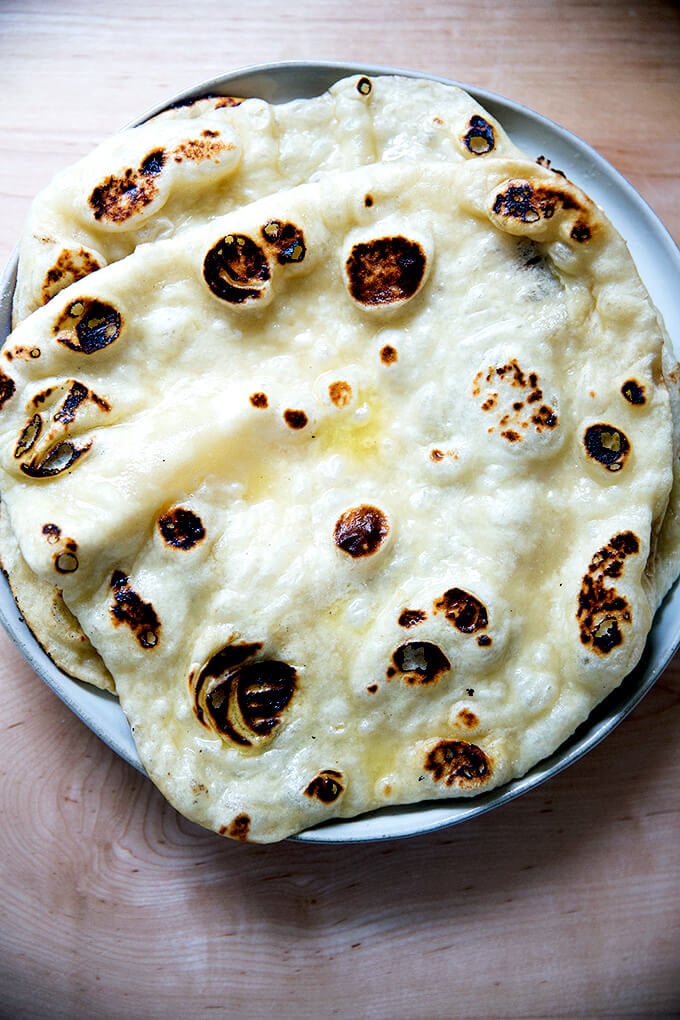
Unparalleled Freshness and Flavor: Straight from your skillet, homemade naan boasts a subtle tang from the yogurt, a delicate yeasty aroma, and a freshness that pre-packaged versions can only dream of. The texture is soft, tender, and beautifully chewy – never stiff or cardboard-like.
*
Superior Texture: The inclusion of yogurt is a game-changer, imparting an incredible tenderness and a slight elasticity that makes each bite utterly satisfying. The quick cook on a hot skillet creates those iconic puffy pockets and slightly charred bubbles, adding another layer of textural delight.
*
Cost-Effective: Made with pantry staples like flour, yeast, salt, yogurt, and water, this recipe is incredibly economical, especially compared to repeatedly purchasing store-bought alternatives.
*
Customization Galore: While delicious plain, homemade naan is a blank canvas for culinary creativity. Brush it with garlic butter, sprinkle with fresh herbs, or top with nigella seeds for an extra burst of flavor.
*
Versatility Beyond Curry: While the perfect companion to your favorite Indian dishes, homemade naan shines in countless other roles – from quick wraps and open-faced sandwiches to dipping bread for hummus or baba ghanoush.
The Magic Behind Our Simple Yeasted Naan Recipe
At its heart, this recipe champions simplicity without sacrificing quality. We've distilled the essence of perfect naan down to a few core principles, focusing on efficiency and flavor. This isn't just about following steps; it's about understanding why each element contributes to the final, delectable outcome.
Essential Ingredients for Flawless Naan
You'll be amazed that such extraordinary results come from just five humble ingredients:
1.
All-Purpose Flour: The foundational starch, providing structure.
2.
Instant Yeast: Our secret weapon for a speedy rise without needing to proof beforehand. It's forgiving and efficient.
3.
Kosher Salt: Enhances flavor and helps control yeast activity.
4.
Greek Yogurt: This is the *imperative* ingredient. It provides a subtle tang that enriches the flavor profile, and more importantly, it contributes significantly to the dough's tender, soft, and chewy texture. Many recipes include oil, eggs, baking powder, or baking soda, but we've found these additions to be entirely unnecessary, often complicating the process without genuinely improving the naan.
5.
Boiling Water: When combined with the cold yogurt, it creates the perfect warm (but not scalding) liquid for activating the instant yeast and bringing the dough together, ensuring a quick, efficient rise.
The No-Knead Revolution: Speed and Simplicity
One of the most revolutionary aspects of this
simple yeasted homemade naan a step by step guide is its no-knead nature. Traditional bread making often calls for extensive kneading to develop gluten. However, for this high-hydration dough, a quick stir and a minute of gentle handling are all that's required. The magic happens during the rise, where the yeast and moisture naturally work to develop the gluten, resulting in a wonderfully pliable and easy-to-handle dough. This saves you significant time and effort, making homemade naan accessible even on busy weeknights.
Furthermore, while naan is traditionally cooked in a tandoor (a cylindrical clay oven), a hot cast-iron skillet on your stovetop perfectly mimics the intense heat required. The direct heat and quick cooking time create those beautiful char marks and the distinctive puffy texture that defines authentic naan. Each piece truly cooks in under 2 minutes!
Your Step-by-Step Guide to Irresistible Naan
Ready to embark on your naan-making journey? Here’s a detailed, easy-to-follow
simple yeasted homemade naan a step by step guide that guarantees success.
Ingredients:
* 2 cups all-purpose flour
* 1 teaspoon instant yeast
* 1 teaspoon kosher salt
* 1/2 cup Greek yogurt
* 1/2 cup + 2 tablespoons boiling water
* Melted butter, for brushing (optional, but highly recommended!)
Equipment:
* Large mixing bowl
* Spatula or wooden spoon
* Measuring cups and spoons
* Lightly floured work surface
* Rolling pin
* Large cast-iron skillet (or other heavy-bottomed pan)
* Lid for skillet
* Pastry brush (for butter)
Instructions:
-
Combine Dry Ingredients: In a large mixing bowl, whisk together the 2 cups of flour, 1 teaspoon of instant yeast, and 1 teaspoon of kosher salt. Whisking ensures everything is evenly distributed.
-
Prepare Wet Ingredients: In a separate medium bowl or a liquid measuring cup, combine the 1/2 cup Greek yogurt with 1/2 cup + 2 tablespoons of boiling water. Stir well until the yogurt is mostly smooth and the mixture is warm, not hot. The boiling water will be tempered by the cold yogurt, creating the ideal temperature for the yeast.
-
Form the Dough: Pour the warm yogurt mixture into the dry ingredients. Using a spatula or wooden spoon, stir until a shaggy dough forms. It will be sticky. You may need to ditch the spatula and use your hands for about a minute, gently kneading and bringing the dough together until all the flour is incorporated and you have a cohesive, sticky, wet ball. Avoid overworking it; just enough to bring it together.
-
First Rise: Cover the bowl tightly with plastic wrap or a clean kitchen towel. Place it in a warm spot for about 1 hour and 15 minutes, or until the dough looks slightly puffed and has increased in volume. A warm spot could be a slightly warm oven (turned off, with just the light on), or simply a warm corner of your kitchen.
-
Divide and Shape: Lightly flour your work surface. Turn the risen dough out onto it. It will be soft and pliable. Gently divide the dough into 4 equal portions. Shape each portion into a small ball. Let these dough balls rest for 5 minutes; this helps relax the gluten, making them easier to roll.
-
Roll Out the Naan: One by one, take a dough ball and, using a lightly floured rolling pin, roll it into an 8- or 9-inch round. Aim for an oval or teardrop shape, or keep it round – whichever you prefer! Don't worry if they're not perfectly uniform; homemade charm is part of the appeal.
-
Heat the Skillet: Place your cast-iron skillet over high heat on the stovetop. Heat it until it's very, very hot – almost smoking. This high heat is crucial for the naan to puff properly and cook quickly.
-
Cook the Naan (Under 2 Minutes!): Place one rolled naan round into the hot, dry skillet. Immediately cover the skillet with a lid. Cook for 1 minute. You'll see bubbles forming and the naan puffing up beautifully.
-
Flip and Finish: Uncover the skillet, flip the naan to the other side, and cook for another 30 seconds to 1 minute, or until it has lovely char spots and is cooked through.
-
Butter and Serve: Remove the cooked naan from the skillet. Immediately brush one side generously with melted butter. Stack the cooked, buttered naan on a plate or platter and cover with a clean kitchen towel to keep them warm and soft while you cook the remaining portions.
Tips for Naan Perfection & Serving Suggestions
To ensure your homemade naan is consistently perfect, keep these tips in mind:
Pro Tips for Optimal Results
*
Don't Over-Flour: While rolling, use just enough flour to prevent sticking. Too much flour will make the naan dry.
*
Hot Skillet is Key: A sufficiently hot skillet is essential for those signature bubbles and quick cooking. Don't rush this step.
*
Experiment with Toppings: Before cooking, you can lightly press minced garlic, chopped cilantro, or nigella seeds into the dough for extra flavor. After cooking, a brush of garlic-herb butter is divine.
*
Dough Ahead of Time: You can prepare the dough and let it rise in the refrigerator overnight. Just bring it back to room temperature for about 30-60 minutes before rolling and cooking.
*
Storage and Reheating: Cooked naan can be stored in an airtight container at room temperature for a day or two, or frozen for up to a month. Reheat gently in a dry skillet, microwave, or oven until warm and soft again.
This simple yet effective recipe showcases the beauty of minimal ingredients and maximum flavor, setting it apart from more complex versions. For more insights into creating the perfect base, check out our article on
Easy No-Knead Naan: Soft & Chewy Homemade Flatbread with Yogurt. And if you're keen on mastering the stovetop technique, you'll find more useful tips in
Your Guide to Fluffy, Buttery Homemade Naan (Stovetop Method).
Beyond the Curry: Versatile Naan Pairings
While undeniably the perfect accompaniment to Indian curries, homemade naan is incredibly versatile:
*
Dipping Delight: Serve with hummus, baba ghanoush, tzatziki, or a simple olive oil and balsamic vinegar dip.
*
Fantastic Wraps: Use as a base for chicken shawarma, Gochujang Buffalo chicken wraps, grilled vegetables, or even breakfast burritos. Its softness makes it ideal for holding fillings.
*
Soup's Best Friend: Tear pieces and use them to sop up hearty lentil soup, tomato soup, or any rich stew.
*
Mini Pizzas: Top with tomato sauce, cheese, and your favorite toppings for a quick and fun weeknight meal.
*
Alongside Grilled Meats: Perfect with kebabs, grilled chicken, or lamb.
Conclusion: Your Naan Journey Starts Now!
There you have it – a comprehensive, yet incredibly straightforward
simple yeasted homemade naan a step by step guide that promises to transform your culinary experiences. This recipe proves that superior flavor and texture don't require complicated methods or exotic ingredients. With just five basic items and a hot skillet, you can create warm, soft, chewy, and utterly irresistible naan in under two minutes per piece. Say goodbye to the dry, disappointing alternatives from the store shelf and embrace the joy of freshly made bread. Dive in, get your hands a little sticky, and prepare to elevate your meals with the unparalleled taste of homemade naan. Once you try it, you'll wonder why you ever bothered with anything else!